Configure Flowsheet Scheduler
The Flowsheet Scheduler allows you to automate and manage flowsheet execution efficiently. You can use it to:
Create calculation groups that include multiple flowsheets, executed in a predefined sequence during each calculation cycle.
Define schedules to trigger calculation cycles at specific times with preset parameters.
Monitor previously initiated calculation cycles.
You can access the Flowsheet Scheduler in either of the following ways:
Choose from the menu.
In the Navigation sidebar, go to .
Note
You can also set up flowsheet scheduling directly using the Scheduling Service. For more information, see Set Up Scheduling Services.
Create Calculation Group
In the Flowsheet Scheduler pane, click
 Add on the toolbar.
In the Scheduler Configuration dialog, enter the required values in the following fields:
Field
Description
Name
Enter a unique name to identify the calculation group.
Description
Provide a brief summary of the calculation group’s purpose or function.
Historical Processing
Select this checkbox to enable historical data processing. When selected, the calculation service processes values starting from the tag IO map’s
LastValueTime. Results are then persisted to the WP historian. Deselect this checkbox to process only current or real-time values.Populate Data Gaps
- (Available only when Historical Processing is selected)
Select this checkbox to fill in missing data intervals. The calculation service inserts values at each
CalculationIntervalwhen input data is missing but future data exists. Deselect it to leave data gaps unfilled in the results.
Calculate Beyond Data
- (Available only when Historical Processing is selected)
Select this checkbox to continue calculations up to the current time using the last known values when no new input data is available. If Populate Data Gaps is also selected, the engine fills each interval with results. Deselect it to stop processing when input data ends.
Save your entries.
Result
A new row for the calculation group gets added to the grid on the Flowsheet Scheduler pane.
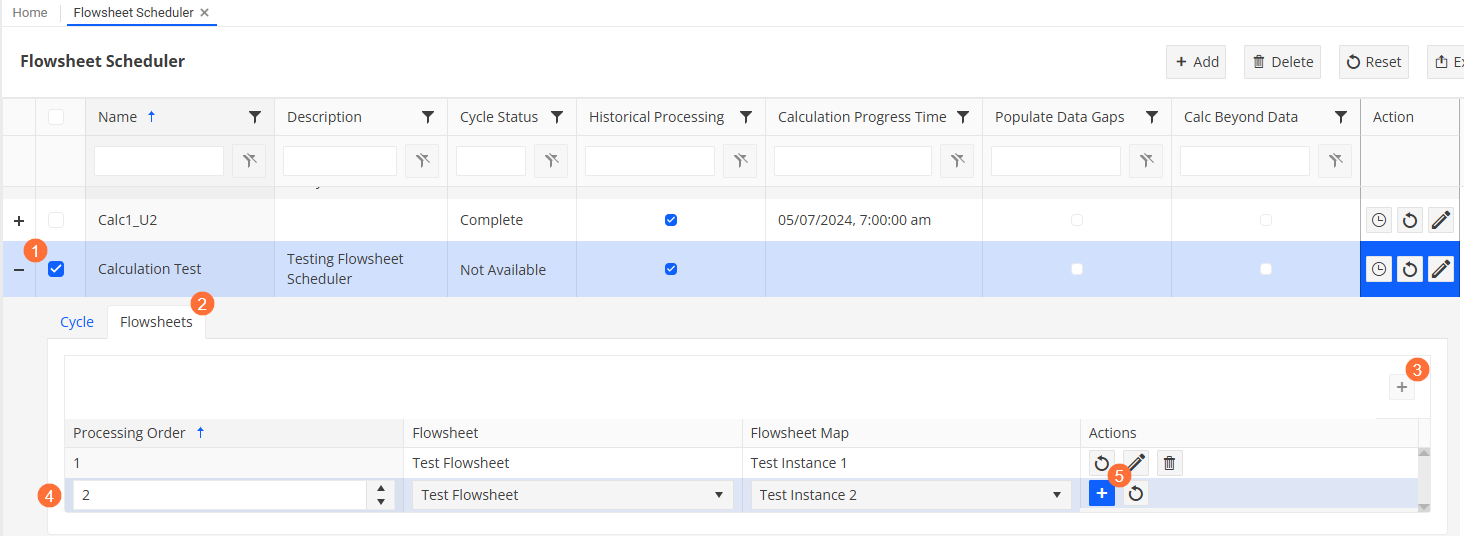
Add flowsheet instances to the calculation group. You can add one or more flowsheet instances to a calculation group as needed.
Expand the row for the new calculation group by clicking the
icon at the start of the row. 
Go to the Flowsheets tab.

In the top right corner of the expanded view area, click
to add a new flowsheet entry. 
In the new row that appears, enter the following details:

Processing Order: Enter a number to define the execution order of this specific flowsheet instance within the group. For example, enter 1 for the first instance to be processed, 2 for the second, and so on.
Flowsheet: Select a preconfigured flowsheet from the dropdown list.
Flowsheet Map: Select a preconfigured flowsheet instance. The available options depend on the selected flowsheet.
Click
 to save your entry.
Note
To add a flowsheet instance to a calculation group, ensure the following conditions are met:
The flowsheet instance is not already assigned to another calculation group.
IO mapping is complete for the selected flowsheet instance.
The selected flowsheet has been validated.
Schedule Calculation Groups
After setting up a calculation group, you can schedule it to trigger calculation cycles automatically based on predefined parameters.
In the Flowsheet Scheduler pane, locate the relevant calculation group and click the
 icon in the Action column.
In the Calculation Cycle dialog, enter the required scheduling parameters:
Field
Description
Scheduler Job Interval (secs)
Specify how often the Scheduler Service should initiate a new calculation job. The default is
60seconds. Set to0to run the job only once (“one-and-done”).Calculation Interval (secs)
Define the “look-ahead” interval for each calculation cycle. The default is
60seconds. This interval determines how far forward the calculation service looks for new input data, starting from the latestLastValueTime. All function block outputs are calculated using this interval, even if input intervals are longer.Max Minutes Per Cycle
Specify the maximum duration (in minutes) that a single calculation cycle should run. The default is
1440(one day). This setting is only used when Historical Processing is enabled. It allows the cycle to continue looping until the specified duration is processed, even ifCycle Run Countis set to1.Cycle Run Count
Enter the number of times the calculation cycle should loop per job execution. The default is
1and this is recommended in most cases. When Historical Processing is enabled, this value may be overridden by the Max Minutes Per Cycle settingClick Submit to save and activate the schedule.
Result
The calculation group is now scheduled to run automatically based on the specified parameters. Each scheduled job will execute the flowsheet instances in the defined order and repeat according to the configured intervals and limits.
Monitor Calculation Cycle
Once you have scheduled a calculation group, you can monitor the calculation cycles that have been triggered according to the schedule.
In the Flowsheet Scheduler pane, locate the relevant calculation group and expand its details by clicking the
icon at the start of the row.Click the Cycle tab to view a list of all triggered calculation cycles. The grid displays the following information:
Field
Description
Scheduler Job Interval (secs)
Shows how often the Scheduler Service triggers a new calculation job, in seconds. This is the value configured when scheduling the calculation group. If the calculation was scheduled directly via the Scheduling Service, this value is 1. In this case, refer to the Scheduling Service to check the job interval.
Calculation Interval (secs)
Indicates the interval used to look ahead for new input data, starting from the latest
LastValueTime.Max Minutes Per Cycle
Displays the maximum duration (in minutes) configured for a single calculation cycle.
Cycle Run Count
Displays the value configured when scheduling the calculation group.
Cycle Status
Displays the current status of the calculation cycle. Possible values include:
Running: The cycle is currently executing.
Waiting: The cycle has completed and is waiting to be triggered again (that is, when Scheduler Job Interval > 0).
Stopped: The cycle was manually stopped via the UI. Scheduled jobs are removed. You can either schedule a new cycle or restart the existing one.
Complete: The cycle has finished processing and will not run again. This status is typically set when:
No further processing is required (for example, Scheduler Job Interval = 0).
A new Scheduled Start is requested for the calculation group. In this case, the current cycle is marked as Complete, and a new cycle is created with status Waiting.
Error: An error occurred during processing. The cycle remains scheduled and will attempt to run again at the next interval (if Scheduler Job Interval > 0).
Cycle Start Time
The timestamp when the cycle began.
Cycle End Time
The timestamp when the cycle completed.
Cycle Control
Manage a cycle that is still in progress using the following options:
 Stop: Ends the calculation cycle.
 Complete: Marks the cycle as complete.
 Refresh: Updates the cycle data in the view.
If needed, update or delete a cycle using the
 or
or  icons. You can also control the cycle using the buttons in the Actions column (see above).
Replay Calculation Groups
The Replay functionality allows you to rerun calculations from a specific point in time, effectively “rewinding the clock” to reprocess data using updated logic or inputs. This is particularly useful when:
Calculation logic has changed (for example, updated formulas).
Input data has been modified and needs to be re-evaluated.
Debugging or validating historical data processing.
To replay a calculation group, follow the steps below:
In the Flowsheet Scheduler pane, locate the relevant calculation group.
In the Action column of the calculation group item, click the
 button to replay the group.
In the Replay Calculations dialog, specify the time from which the replay should begin in the Last Value Time field. The system resets its internal clock to the specified time and will begin recalculating from that point forward.
Click Submit.
Result
The system reruns the calculation cycle and reprocesses all data from the start time up to the current time. Note that it ignores the Max Minutes per Cycle limit during calculation and keeps calculating until the current time.
Note
Currently, the system does not auto-refresh during replay. Manual refresh is required to monitor progress.
Update Calculation Groups
You can update the main parameters of a calculation group or add/edit flowsheet instances within the calculation group at any time.
In the Flowsheet Scheduler pane, locate the relevant calculation group.
Proceed in one of the following ways:
To edit the main parameters of the calculation group, click
in the Action column of the calculation group item.To add or edit the flowsheet instances within the calculation group:
Click
in the first column of the calculation group row to expand its details.Navigate to the Flowsheets tab.
To add a new flowsheet instance, follow the steps described above. To edit an existing entry, click the
button in the Actions column of the relevant flowsheet instance.
Update the field values as required.
Save your changes.
Delete Calculation Groups
To delete calculation groups, follow the steps below:
In the Flowsheet Scheduler pane, locate the relevant calculation groups.
Select one or more calculation groups in the grid and click
Delete on the toolbar.Confirm the deletion.