Configure Data Substitutions
Data Substitution in Wood InsightsPlatform (WIP) allows substituting data into a tag or set of tags’ time series history.
To perform data substitution in WIP, you must first set up and configure data substitution and then process it for execution. See the steps below for the whole process.
Set Up Data Substitution
Choose from the menu.
On the Data Substitutions tab, click
 Add on the toolbar.
In the Data Substitutions Configuration dialog, enter data as follows:
Field
Description
Name
Enter a name that uniquely identifies the data substitution. You can edit this name even after the data substitution has been processed.
Tags
Select one or more tags for which you want to substitute historical values.
Start Time
Set the starting point in history from which the data substitution should begin. This ensures that only data from this point onward is affected.
End Time
Set the ending point in history up to which the data substitution should apply. This limits the substitution to a specific time range.
Active
Select this checkbox to enforce the data substitution. If deselected, the original data will be retained (assuming Preserve Original was chosen for the active data substitution).
Preserve Original
Select this checkbox to keep a backup copy of the original historical values. This is useful if you need to revert to the original data later.
Comment
Add any notes or comments about the data substitution. This field can be edited after the data substitution is processed.
Data Sub Option
Choose one of the following options for how the data substitution should be handled:
No Changes: Keep the previously configured Stage Values (values used for data substitution) as they are.
Manual: Enter an interval and a value to set the Stage Values. You can adjust individual Stage Values before processing the data substitution.
File Upload-Replace: Upload a CSV file to replace all existing Stage Values. You can adjust individual Stage Values before processing.
File Upload-Add: Upload a CSV file to add to or overwrite existing Stage Values. You can adjust individual Stage Values before processing.
Save your entries.
Result
A new row for the Data Substitution entry gets added to the grid. You can process, update, or delete the entry using the corresponding icon in the Action column. For information about processing, see the section below.
Process Data Substitution
Once the Data Substitution has been saved, it can be processed to make the actual changes in the database. This ensures that the updated data is reflected in all subsequent calculations and aggregations.
Still on the Data Substitutions tab, click the
 (Process Data Substitution) icon in the Action column of the relevant data substitution row.
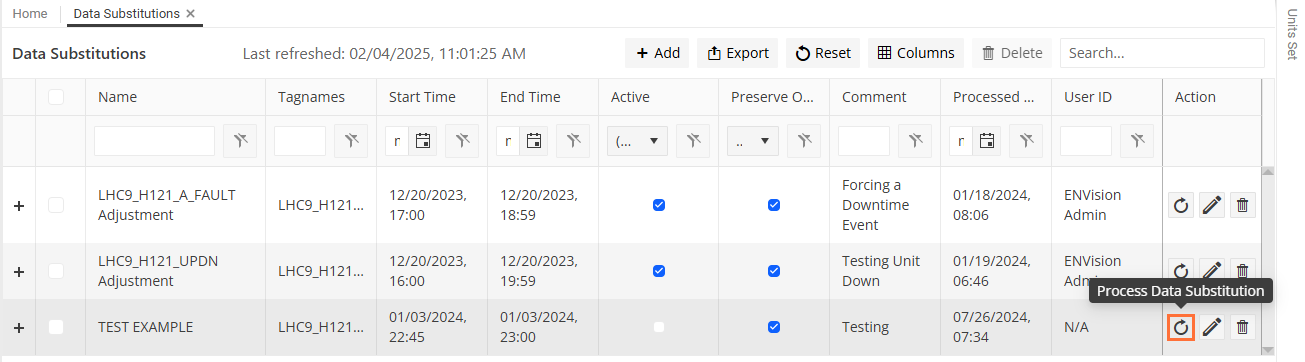
In the confirmation dialog, select Yes to confirm the action.
Result
Processing Active Data Substitution
Processing an active Data Substitution results in the following:
Original historical values are preserved if the Preserve Original checkbox was selected.
Default historical values are removed and replaced by the Stage Values.
Aggregation, Calculation, and Event Replays are initiated.
User ID, Processed Data Time, and Replay Completed Data Time are adjusted. Note that the Replay Completed Date Time will progress as each replay is completed (this could take several minutes depending on the magnitude of the substitution).
Processing Inactive Data Substitution
Processing an inactive Data Substitution results in the following:
If the Preserve Original checkbox was selected, default historical values are removed and replaced by original historical values.
If the Preserve Original checkbox was not selected:
No historical value changes are made.
Aggregation, Calculation, and Event Replays are initiated.
User ID, Processed Data Time, and Replay Completed Data Time are adjusted. Note that the Replay Completed Date Time will progress as each replay is completed (this could take several minutes depending on the magnitude of the substitution).
CSV File Format for Data Substitution
If you’re uploading a CSV file for data substitution, you must prepare the CSV file considering the following:
The first row can be a header row, provided the first character is non-numeric.
Subsequent rows should contain the data substitution data.
The first 3 columns are used. Any additional columns are ignored and may be used for user benefit.
The first 3 columns must be in this order:
Tag ID,Timestamp(UTC format - yyyy-mm-dd hh24:mi:ss), andValue.Quality always defaults to Good-DataSubstituted for active data substitutions.
CSV File Example
ID,Timestamp,Value,Name,Description
1,2022-01-01 00:00:00,3.3,TagA,Tag A of A-Z
2,2022-01-01 00:00:00,6.3,TagB,Tag B of A-Z
3,2022-01-01 00:00:00,9.3,TagC,Tag C of A-Z