Configure Events
To enable the creation of Events in Wood InsightsPlatform (WIP), you need to configure the necessary settings as described below.
Define Event Parameters
Before creating event configurations, you must first define some parameters that can be assigned to the event configurations. Follow the steps below:
Choose from the menu.
On the Event Configuration tab, click
 Config on the toolbar.
In the Configuration dialog, define parameters as follows:
On the Classification tab, click
 Add to specify a new classification option. These classification options can be assigned to events during event configuration to categorise them based on specific parameters. For example, you can classify events by priority, such as “High”, “Critical”, or “Low”.
On the Type tab, click
Add to specify a new event type option. These event types can be assigned to events during event configuration to group them. For example, event types could include “Limit”, “Downtime”, etc.On the Reason Codes tab, click
Add to specify a new reason code. When a user acknowledges an event, they can select from the reason codes defined here to indicate the reason of the acknowledgement.On the Corrective Actions tab, click
Add to specify a new corrective action value. When a user acknowledges an event, they can select from the corrective actions defined here to indicate the corrective action required to sort out the event.
To edit or delete any of the entries for the parameters above, click ![]() or
or ![]() in the Action column of the relevant row.
in the Action column of the relevant row.
Create Event Configuration
Choose from the menu.
On the Event Configuration pane, click
Add on the toolbar.In the Event Configuration dialog, follow these four steps to specify the field values, as detailed below:
Step 1: Define general event parameters.
Field
Description
Required
Name
Specify a name that uniquely identifies the event.
Yes
Notes
Enter any additional event information if required.
No
Message
Specify the message to be included in the notification.
Yes
Event Type
Select configurable values that allow event grouping, such as “Limit” or “Downtime”. The available values are preconfigured as described in the Define Event Parameters section.
Yes
Event Classification
Select configurable values that allow event categorisation, such as “High”, “Critical”, or “Low”. The available values are preconfigured as described in the Define Event Parameters section.
Yes
Enabled
Select this checkbox to activate the event configuration.
Yes
Step 2: Set up event scheduling and acknowledgement requirements.
Field
Description
Required
Period (sec)
Specify how often (in seconds) to evaluate the event definition.
Yes
Reacknowledge Period (sec)
Define the time frame within which a user must reacknowledge an event after it has been initially acknowledged. A reacknowledgement may be required if the condition that triggered the event remains true and the event is still in active status. Even after acknowledging an event, the system can send another notification and request for reacknowledgement if the event remains active beyond the time set here. To disable reacknowledgement, set this value to 0.
Yes
Recheck period (sec)
Specify how often (in seconds) an open event needs to be re-evaluated.
Yes
Require Acknowledgement
Tick this checkbox to force the user to acknowledge the event, even if the event has been closed.
No
Require Acknowledgement Details
Use this checkbox in combination with “Require Acknowledgement” to force the user to enter details when acknowledging the event.
No
Reason and Corrective Action
No
Step 3: Make settings for tracking and notifications.
Field
Description
Required
Retain Tag
Select an optional tag where the value that triggers the event is to be stored.
No
Notification Group
Choose the group that will receive notifications when an event occurs. Notification groups are predefined as described in Configure Notifications.
No
Log
Tick this checkbox if you want the event to add a record to the running log for further tracking.
No
Use Output Tag
When activated, specify the following fields:
Output Tag: Select the tag where the output value (on or off) is saved.
Output Value On: Enter the value to use when the event is active.
Output Value Off: Enter the value to use when the event is inactive (closed).
No
Step 4: Set up the conditions that trigger event creation when they are true.
Field
Description
Required
Type
Specify the type of condition. Options include “Limit” or “Stale.”
Yes
Tag
Select the tag that contains the values or quality to monitor.
Yes
Order
Define the order in which this condition is evaluated as compared to other conditions. This is applicable when using a Multi-Level Operator.
Yes
Multi-Level Operator
Indicate the logical relationship (AND/OR) between multiple conditions when more than one is configured.
No
Compare Quality
Choose whether to compare the tag’s value or its quality. When OFF, the tag value is compared against a limit or another tag. When ON, the tag’s quality is used for comparison.
No
Quality
Specify the quality value to compare against when Compare Quality is ON.
Yes
Operator
Select the mathematical operator used for comparison when Compare Quality is OFF.
Yes
Compare Against Tag
Indicate whether the comparison value comes from another tag. When ON, specify the tag for comparison.
No
Check Value Tag
Select the tag to use for comparison when Compare Against Tag is ON.
Yes
Check Value Constant
Specify a hardcoded value to use for comparison when Compare Against Tag is OFF.
Yes
Check Value Units
Specify the units for the hardcoded comparison value when Compare Against Tag is OFF.
Yes
Click Submit to save your entry.
Tip
You can also create a new event configuration entry by copying an existing one and editing its values. To copy an event configuration entry, click ![]() in the Action column of the relevant row:
in the Action column of the relevant row:
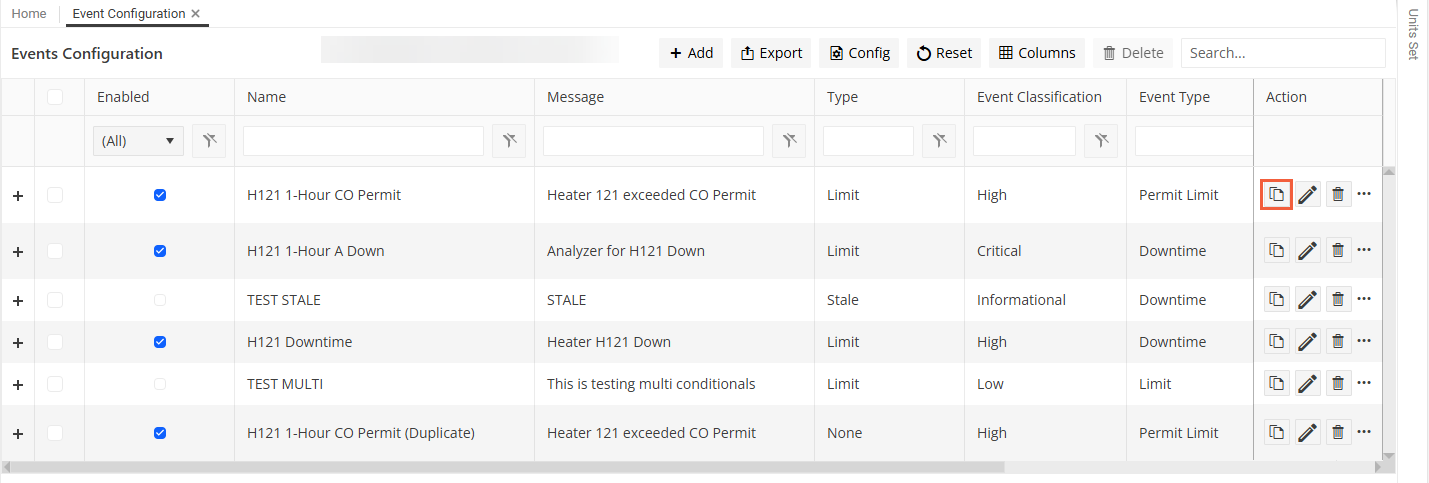
This creates a new entry for the copied event configuration, which you can edit as required.
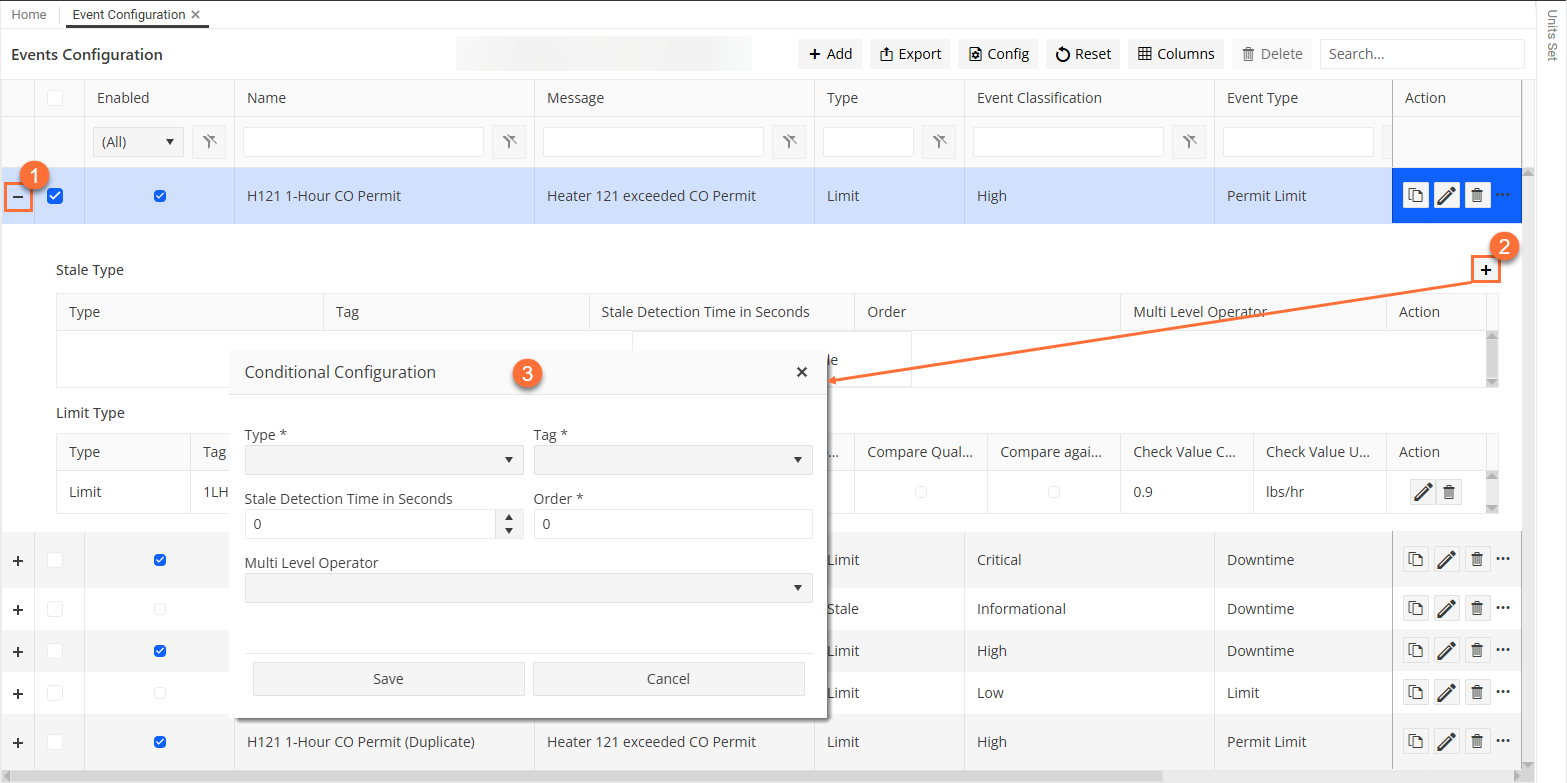
Add Additional Condition to Event Configuration
You create the first condition when you set up a new event configuration as described above. To add another condition to the event, follow the steps below:
Choose from the menu.
On the Event Configuration pane, click the
expand button in the first column of the relevant event configuration entry. This expands the details of the conditions assigned to the event configuration.On the right-side of the expanded pane, click
to add a new condition.In the Conditional Configuration dialog, enter the field values for the condition as required. See the Create Event Configuration section for more information about the fields.
Save your entries.
Edit Event Configurations
Choose from the menu.
On the Event Configuration pane, click
 Edit in the Action column of the required event configuration entry.
In the Event Configuration dialog, update the values as required.
Click Submit to save your entries.
Delete Event Configurations
Choose from the menu.
On the Event Configuration pane, proceed in one of the following ways:
Select one or more event configuration entries in the grid and click
 Delete on the toolbar (Option 1).
Click
in the Action column of the event configuration entry that you want to delete (Option 2).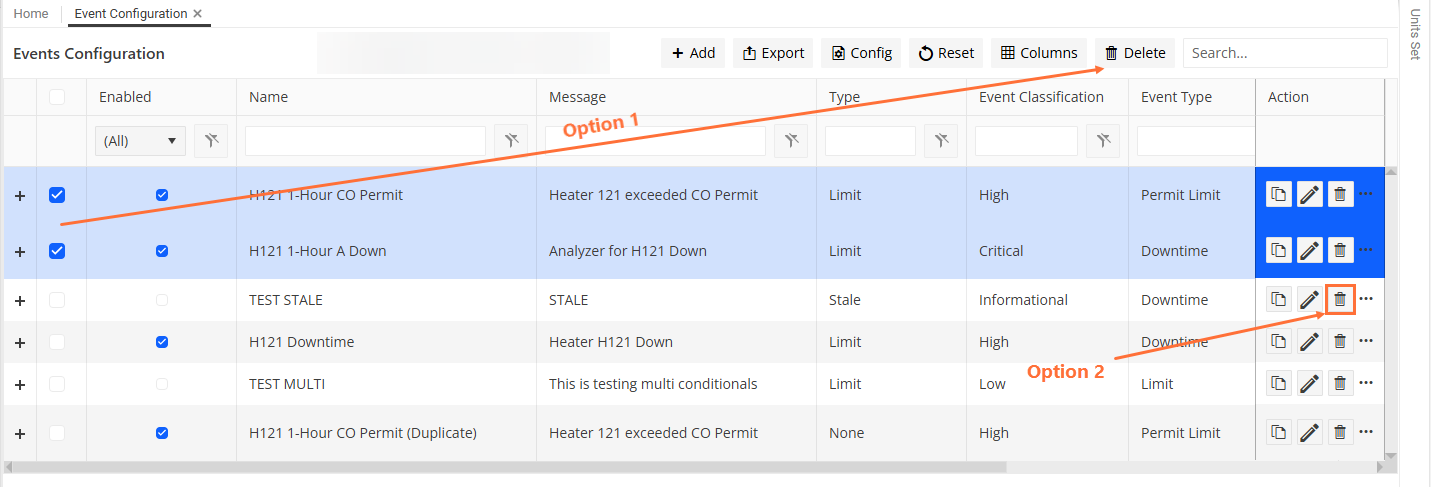
Confirm the deletion.
See also